Adding and Customizing Features
Overview
This explains the process of adding, customizing, and updating features using extensions.
- Before Using Extensions
- Installing Extensions
- Updating Extensions
- Adding Extension Distribution Locations
Before Using Extensions
Connect to the internet to search for and obtain extensions.
Please check if you can connect to the following link: "[Denso Create Official] Extension Server" (https://lightningreview-nuget.azurewebsites.net/nuget/)
If the link does not result in an error, there is no problem.
It can be used even in environments where internet connection is unavailable or restricted.
For details, please refer to the following link: "[Add an Extension Distribution Destination]"
Installing Extensions
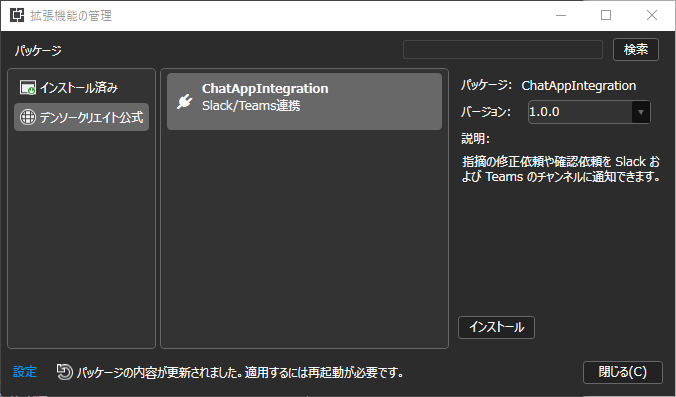
- Click [Tools] menu - [Manage Extensions] to launch the [Manage Extensions] dialog box.
- Select the extension you want to install.
- Entering keywords in the search box in the upper right corner of the dialog box will display extensions containing those keywords in the "Package Name" or "Description".
- Click [Show All] next to the [Version] label and select the version you want to install.
- Click the [Install] button.
- After installation, restart Lightning Review.
If Extension Installation Fails
If your internet connection is routed through a proxy server, the extension installation may fail.
If it fails, the following network settings are required:
-
In the [Manage Extensions] dialog, click the [Settings] link to display the [Extension Settings] dialog.
-
Click the [Network Settings] link to display the [Network Settings] dialog.
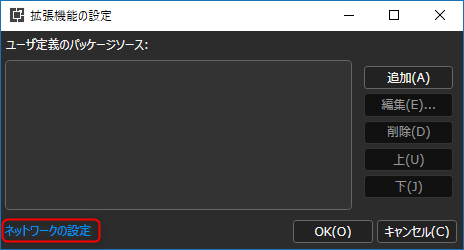
- In the dialog, set the proxy information.

After performing the above steps, please proceed with the extension installation.
Updating Extensions
Extensions are always updated.
If a newer version is available since the initial installation, please update using the following method.
- Click [Tools] menu - [Manage Extensions] to open the [Manage Extensions] dialog box.
- Select the extension you want to install.
- Click the [Update] button in the description field.

Adding an Extension Distribution Destination
You can use a shared folder on the network as the distribution destination for the extension.
The extension can be used in environments without internet access or with limited internet access.
Please store the extension file (xxx.nupkg) in a network folder or similar location beforehand.
- Click [Tools] menu - [Manage Extensions] to open the [Manage Extensions] dialog box.
- Click the [Add] button to open the [Edit Package Source] dialog box.
- In the [Edit Package Source] dialog box, enter the following:
- Name: Any string (This will appear in the list in the [Manage Extensions] dialog box)
- URL: Shared folder containing the extension files
