Correcting the Issues
Overview
After conducting the review, the document under review will be corrected based on the issues raised.
This section explains how to check the registered issues and how to reflect the corrected issues in the review file.
Workflow for Correcting Issues
The workflow for correcting issues is as follows:
-
Check the details of the feedback
Check the details of the feedback for which you are the assigned person. -
Revise the deliverable based on the feedback
Revise the document under review based on the feedback. -
Record the revisions
Reflect the revisions in the review file and change the status of the feedback.
Checking Feedback
- Select [Tile View] or [Grid View] from the [View] menu to display the list of feedback.
- Move the mouse cursor over the relevant feedback in the feedback list and display the [Details] screen from the displayed [Details] button.
- Click the [Feedback] button on the [Details] screen to check the details of the feedback.
It is convenient to use the filter function as needed to narrow down the displayed feedback.
- Click the
 icon to display the filters for feedback.
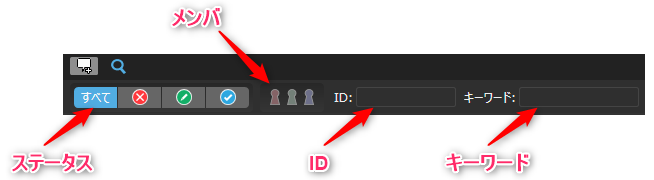
- The following types of filters are available:
| No. | Content | Details |
|---|---|---|
| 1 | Status | Filter by specifying the status. |
| 2 | Members | Displays only the issues for which you are the responsible person (reporter, corrector, reviewer). Multiple selections will result in an OR condition. |
| 3 | ID | Filter by specifying the ID. Entering IDs separated by spaces will result in an OR condition. *ID is information that uniquely identifies an issue within the review. It is automatically assigned when an issue is added. |
| 4 | Keyword | Filter by specifying any string. The search targets are "Description," "Comments," and "Custom Fields 1-20." |
Revising Deliverables Based on Issue Content
Check the content of the issue for which you are the responsible person and revise the document under review.
Recording Corrections
Record the corrections on the [Details] screen for each issue.
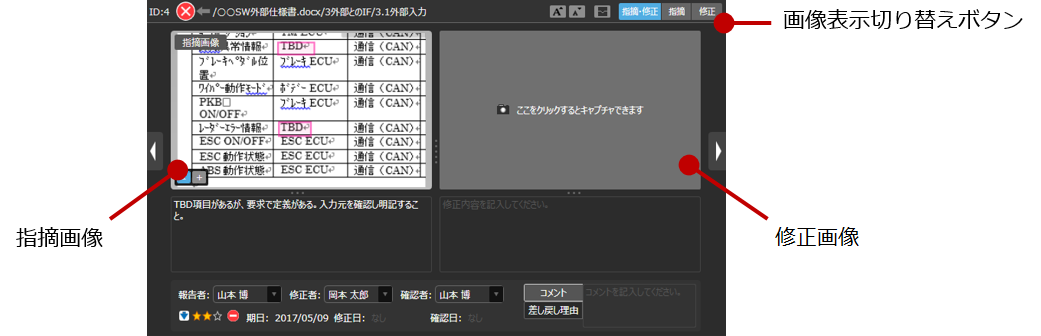
The procedure is as follows:
- Move the mouse cursor to the target issue in the list of issues, and click the displayed [Details] button to display the [Details] screen.
- Click the [Issue - Correction] button on the [Details] screen to display the screen for entering corrections.
Clicking the [Correction] button allows you to enter corrections on a larger screen.
- Click [Click here to capture].
- Drag the icon to capture the corrected area of the document under review.
If there are multiple corrected areas due to horizontal expansion, etc., you can register multiple images by clicking the  icon.
icon.
- Drag on the captured image to enclose the area to be corrected with a pink frame, and identify the area to be corrected.
- Enter the correction details in the text box below the captured image.
- Click the Status icon in the Details screen or Properties pane,
Change the status from "Uncorrected " to "Corrected
  ".
".