Creating a Review File
Overview
Before starting the review, create a review file to register the review information. To conduct a review, create a review file using the following steps:
-
Create a review file
Prepare a review file to register the review information. -
Set basic review information
Register basic information such as the purpose of the review file and the review format. -
Register documents to be reviewed
Register the documents to be reviewed in the review file.
Creating a Review File
Create a review file using one of the following methods:
- Create a new review file
-
Create a review file from the [File] - [New] menu.
-
Create a review file from [New] under [Start Review] on the start page.
- Copying a Review File for Templates This method involves pre-defining the review file with information about the review participants and attributes of the comments, and then duplicating it.
This is recommended because you don't need to define it each time you review, and you can start the review immediately.
Setting Basic Review Information
For information on what to set in the review file and the procedure, please refer to the following link: : Setting Basic Review Information
Registering Documents for Review
Documents for review can be registered in the following three ways:
Manual Registration
Register documents manually using the following method:
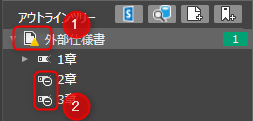
- Click ① and add a "Document".
- Click ② and enter the chapter structure within the document.

Dropping onto the "Outline Tree"
By dropping the file to be reviewed onto the outline tree, it is registered as a document.
Furthermore, a link to the file is automatically set.
No effort is required for file registration or link setting, and you can start the review immediately.

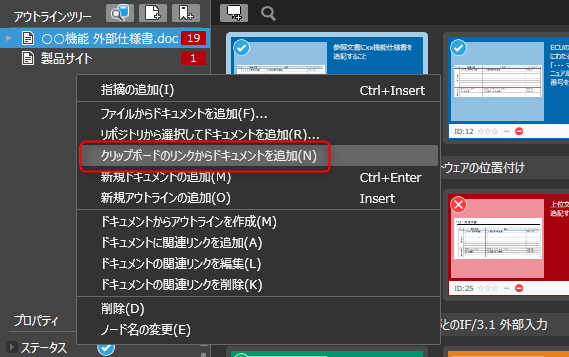
Adding from a Clipboard Link
You can add a document from a file path copied to the clipboard using the following steps:
-
Copy the file path or URL to the clipboard beforehand.
-
Right-click on the "Outline Tree".
-
Select "Add document from clipboard link".
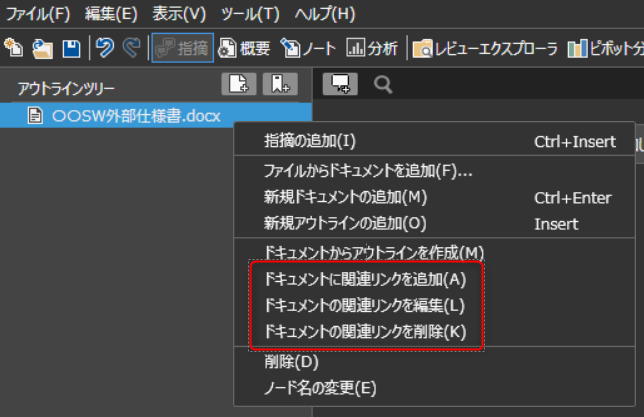
Setting related links to documents
You can set URLs and file paths to registered documents and associate them with other documents.
- By associating the pre- and post-revision deliverables, you can quickly check the content before and after the revision.
Up to 5 links can be set, so you can register related materials for smoother review.
- Set links can be edited or deleted later.
To set links, right-click the target document and select the operation you want to perform.
By giving it a name, you can easily find the document you want to check.
The following settings are also available, so please use them according to your operations.
Setting Relative Paths
The document path is recorded along with its relative path from the review file.
If the relative path from the review file to the document under review remains unchanged,
you can jump to the document link, allowing for smoother reviews in the following cases:
- When the path changes due to moving an entire folder in a shared folder
- When managing the review file and the document under review in the same repository using GitHub or Subversion
Setting URLs
You can set URLs for documents, allowing you to associate the following documents as well.
- Documents stored in cloud services
- Documents registered in configuration management tools such as "Subversion" or "GitHub"
- URLs of homepages, etc.
By setting a URL in a document, you can quickly check the results, for example, by automatically opening a browser with the  button.
Adding a Document Outline
You can add not only the document itself, but also its internal chapter structure as an outline.

You can create an outline with one click if the following conditions are met:
- The document is associated with a file.
For details, please refer to the following link: "Setting Associated Links to Documents" - The file format is as follows.
| File Format | Extension(*) | Link to Details |
|---|---|---|
| Microsoft Office Documents (Word, Excel, PowerPoint) | Not Required | |
| PDF Files | Not Required | |
| Source Code (C, C++, C#, Java, Python, VB.NET, Typescript) | Not Required | |
| Markdown Files | Required | ■ |
| Next Design Project Files | Required | ■ |
- If the extension is "Not Required," you can use it by installing Lightning Review.
Select the target file and right-click to select "Create Outline from Document."
Please refer to the following link for instructions.
"Manually Register Files"
Notes
- If a URL is set in the link, the page will open in the browser, but the outline will not be created.
- If the URL link destination is an Office document, etc., the file will be downloaded from the browser.
Open Documents
By opening the link destination set in the document from the button on the registered document,
you can reduce the effort required to open documents necessary for review, such as documents to be reviewed or input documents.
Manage Review Status for Each Outline
When a part of a design document is changed, it can be difficult to determine which chapters are subject to review, increasing the risk of overlooking changes.
You can set the review status for each chapter on the outline tree to clearly define the review targets.
Set the status by right-clicking the target as shown in the diagram below.
To delete the review status, please select "Clear Selection".
This is shown in diagram ① below. ② is not the target, but the others indicate that they are incomplete.
Sharing Review Files
You can share the review file you created with other users.
Multiple people can register comments on the same file at the same time.
Preparation
- Select "Share Review" from the "Tools" menu.
- Check "Allow simultaneous editing by multiple users and sharing of reviews."

Review Implementation
Saving the review file will reflect the changes made by other users on the screen.
- Restarting LR is not required.
- If the same comment is edited simultaneously, the later saved comment will be reflected.
Restoring Deleted Comments During Sharing
Information about comments deleted during sharing mode remains in the review file.
Comments that were accidentally deleted can be restored using the method at the following link.
Deleting many comments may increase the file size.
- In that case, please temporarily disable sharing mode and save the review file.
This will also delete the information of the deleted file, reducing the file size.
- Afterwards, please set sharing mode again.