Conducting a review
Overview
In a review, you check the contents of the target document and point out mistakes, deficiencies, and good points.
Lightning Review records the points raised in the review and manages the situation with statuses, etc.
Here, we will explain the contents and registration method of the comments.
Review implementation flow
The flow for implementing a review and registering comments is as follows.
-
Add comments.
There are two ways to do this.- Add comments from the outline tree
Add comments by specifying the document's comment area from the outline tree. - Add comments from Word, Excel, or PowerPoint
Add comments directly on the screen of the document to be reviewed (Word/Excel/PowerPoint).
- Add comments from the outline tree
For details, see the following link.
"Switch to sidebar display"
-
Write down the comments.
- Enter details and intent in the pointed image
Enter the detailed location and intent of the pointed image in the captured image. - Set detailed information in properties
Set detailed information such as the severity and the person who corrected the pointed comment from the properties.
- Enter details and intent in the pointed image
-
Save the review file
Save the information of the pointed comment added in the review file.
Switch to the sidebar
By using the sidebar, you can comfortably record comments while keeping the document to be reviewed or corrected displayed.
- Click
 on the point display toolbar to switch to the sidebar display.
 - The sidebar displays the Lightning Review screen on the left side, and can be collapsed with the
 button.
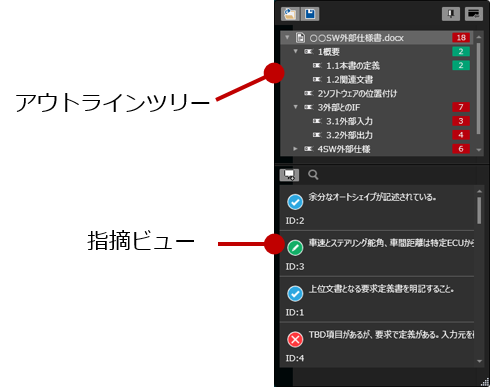
Adding a problem from the outline tree
Add a problem by specifying the problem location in the document from the outline tree.
By specifying an outline, the information of the problem location can be automatically entered.
-
Click the
 icon on the outline to which you want to add a problem to display the Quick Review window.
 -
Click the button with the
 icon in the Quick Review window.
 -
Drag the area on the document to capture an image.
-
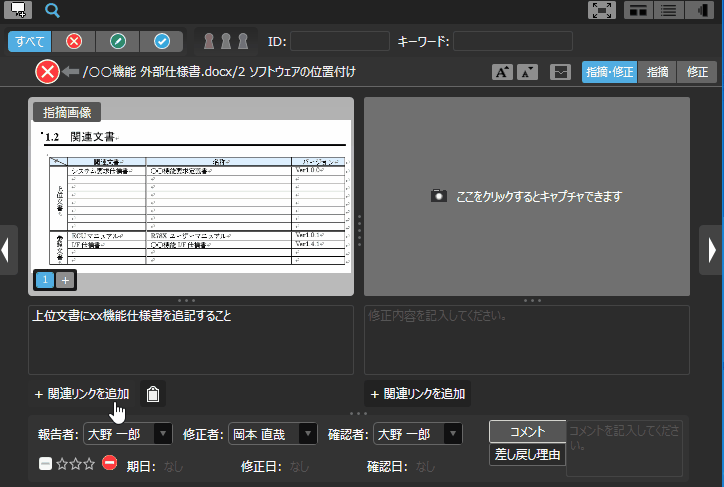
Enter the details and intent of the area on the captured image.
For details, see the following link: Enter details and intent on the imageIf there are multiple areas to be corrected, such as horizontal expansionYou can register multiple images by clicking the
 icon.
icon. -
Enter the content of the problem in the text input area at the bottom of the captured image.
If you want to manage the reason for the problem, enter the reason for the problem. -
If there is any material related to the problem, set a link to it.
For details, see the following link. : Add a link to the issue -
Click the [Add] button to register the issue.
Add a link to the issue
You can easily set a link to the document related to the issue.
Add a link as necessary to clarify the file that was input to the deliverable to be reviewed or to convey the intent of the issue.
- The added link will be displayed on the screen with the name you entered, so you can immediately determine the link destination.
- Up to five links can be set for one issue.
- Links can also be set for the revision column.
If the file version after the revision is different depending on the issue, you can also set a link destination after the revision for each issue.
Example: When the source code is divided into multiple GitHub commits. - You can edit or delete a created link by right-clicking it.
How to create a link
You can add a link by clicking [Add related link]/[+] to the right of a set link.
You can also add links easily using the following methods.
-
Add from clipboard
Copy the path or URL of the linked file from Explorer or a browser,
and add it from the clipboard button.
-
Enter URL by dragging
You can enter the URL displayed in the browser by dragging and dropping it.
Add comments from Word, Excel, or PowerPoint
You can add comments directly from the Lightning Review add-in of the document to be reviewed (Word/Excel/PowerPoint).
If the outline is automatically analyzed, the information of the comments will be automatically entered.
First, open the document to be reviewed and click the [Add Comment] button on the [Lightning Review] tab.
-
Word

-
Excel

-
Power Point

Open the Quick Review window in Lightning Review, and the document to be reviewed will be automatically registered in the outline tree.
A screen will appear to select the following.
- Add a document to an open review
- Create a new review file
Then, add comments from the Quick Review window.
For instructions, see the following link. "Add from outline tree"
Write details and intent on the pointed out image
Write details of the pointed out part and intent on the captured image.
When you place the mouse cursor on the image, the editor will appear in the upper right corner of the image.
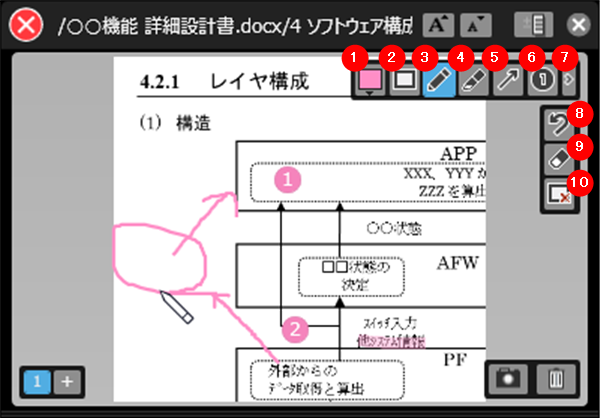
| Number | Item | Description |
|---|---|---|
| 1 | Change color | Select a color. |
| 2 | Rectangle | Add a rectangle by dragging and dropping. |
| 3 | Pen | Draw with a pen. |
| 4 | Highlighter | Draw with a semi-transparent pen. |
| 5 | Arrow | Add an arrow by dragging and dropping. |
| 6 | Number | Add a stamp with circled numbers (① to ⑨). |
| 7 | Collapse | Toggle the buttons to be displayed. |
| 8 | Undo | Cancels the previous operation and returns to the previous state. |
| 9 | Eraser | Deletes a specific selected item. |
| 10 | Clear Edits | Deletes all entered content. |
Set detailed information in properties
Set detailed information such as the severity and the person who modified it from the properties for the added issue.
-
From the [View] menu, select [Tile View] or [Grid View] to display a list of issues.
-
Select the target issue from the list of issues.
-
Enter the details of the issue in the [Properties] pane.
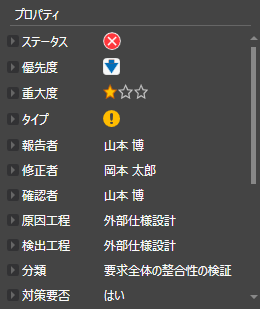
The minimum items required to complete a review issue are as follows.
| Item | Purpose |
|---|---|
| Measures Required | Specify whether or not to respond to the indication |
| Status | Indicate the status of the indication |
| Explanation of the pointer | Indication of the indication's response status |
| Indication Description | Explains the contents of the indication |
| Modifier | Specify the person responsible for correcting the deliverable based on the indication |
| Confirmer | Specify the person responsible for confirming the correction contents |
Tips
When entering detailed information from the properties, it is useful to use the following functions.
-
Change the display order of properties.
By displaying frequently used items at the top, you can check and enter the contents more efficiently.- Click [Change the Display Order of Properties] on the [Tools] menu to display the [Change the Display Order of Properties] dialog box.
- Select a field from the field list in the [Change the Display Order of Properties] dialog box and change the display order with the
 button.
-
Changing property information collectively
It is possible to set the same value for multiple issues collectively.- In the Issues view, hold down the "Ctrl" key and select multiple issues to be targeted.
- By changing the property in the [Properties] pane, the properties of the selected issues will be changed collectively.
Save review file
Save the information of the issue added from the [File] - [Save] menu.
For details, see the following link.
"Share review file"
Notes on saving
- If there are a large number of issues and captured images, it may take some time to save.
- Lightning Review cannot be closed until saving is complete.